It's been just over a month since I've been up flying! Way too long, especially for flying that is this fun. My instructor has been out of town (more like out of the entire continent) for about three weeks and the weather around here has been real sketchy as of late.
Today was a bit different from before as we flew out of my instructors home airport up in Arlington. (KAWO) The weather today was absolutly perfect, a little chilly, and perfectly clear all around the airport.
We had a bit of a late start due to an air leak in the tail wheel. We had to stop mid-taxiway as the tail wheel was riding on the rims! Ouch! About an hour later we had replaced the wheel and were back on our way over to the fuel pumps to takeoff.
We didn't really have a major plan of action for this flight since I haddn't been up in a while. Although, he did introduce to the fun world of the half -Cuban. One which is much more challenging than I was anticipating. Finding that 45* downline is rather interesting and make that 1/2 roll to level can also prove troublesom. I did many of them, maybe around 5 or 6 I'd guess. Between them I would practice 2-pt rolls and inverted flight to get accustomed to the roll I that is required on the downside of the half cuban.
Along with that I also did my favorite maneuver a bunch of times, the inside and outside Humpty bump! Boy is that fun! I'd have to say, of the two variations, my favorite is definitely the outside humpty.
One thing I really didn't notice until after I landed was how comfortable I was with the airplane on this flight. I didn't feel like I was "flying my instructors plane" any more but maneuverd about the sky as if it were my own. If I needed to take a good look at the ground beneath me for reference I just would pitch the aircraft up and roll it to the side to have a look beneath me. I was consistantly over the points I wanted to be over and kept a very good eye out for traffic. Dispite the fact I may not have executed the maneuvers how was hoping, I still felt as though the flight was many steps forward with regard to my feeling of comfort and confidence in the aircraft itself. Also I made it a point to strap myself in a little tighter than I have in the past. This time when I would roll inverted I no longer felt myself raise off the seat. Slightly uncomfortable, but once I got airborne I really didn't notice.
I recently purchased (recent as in last night) a digital video camera that mounts to a helmet/headset that I will take up with me for my next flight. This should prove to be quite fun and hopefully enable me to learn more during post-flight briefings! Plus it'd just be awesome to have a video from MY perspective while doing this fun stuff! :) The camera is due to arrive this Wednesday and I'll try to go flying on Thursday (weather permitting) to test it out!
Anyway, I know it has been a terribly long time since my last post, but there really hasn't been a lot going on!

Thursday, October 25, 2007
Saturday, September 22, 2007
Aerobatics Flight II: Slow Roll, Immeman, in/outside Humpty, 2 Pt roll, Inverted Flight

Well, today I had my second flight! And boy was it fun! We reviewed the maneuvers we did on the first flight (loop, spins, aileron roll, and inverted flight) then added a few more: Slow Roll, 2-pt roll, Immelman, and Inside/Outside Humpty-Bump.
The slow roll really has a deceiving name. Speed has nothing to do with the maneuver as it still requires full stick deflection and maximum roll rate. The aileron roll actually traces a corkscrew through the sky, where the slow roll is supposed to be axial. This means the airplane is supposed to maintain constant altitude and heading throughout the maneuver, rotating only along a single axis (longitudinal). The challenge is that it requires precise coordination between all flight controls. Throughout the maneuver your feet are moving constantly to adjust to the rapidly changing roll attitude, and the stick adjusts to keep the nose on the horizon while inverted. It is somewhat disorienting at first as your body gets slammed to the left, then straight up out of the seat, then right, then you settle back down in your seat at the end. (for a roll to the left, of course) It can leave you a little confused at the end. Well, I should say that I could see how that would be possible. It didn't confuse me but I'm a roller coaster junkie and I can't get thrown around enough!
Execution: Start this maneuver at the same speed as the aileron roll, 120 mph. Then simply apply full aileron deflection in the direction you want to roll (for this example it will be a roll to the left). As you move the stick you actually want a little bit of left rudder, but as soon as you've reached the stop start feeding in right rudder. As your wings approach the 90 degree point you'll be feeding in gradually more "top" rudder to maintain attitude and altitude. But beware, too much right rudder and your roll rate will quickly decrease! It is quite noticeable as it is almost as if someone put the brakes on your roll rate. Due to adverse yaw you will find you don't need very much right rudder... much less than the later portion of the maneuver. At the 90 degree bank point you should reach maximum rudder required for the roll then begin to gradually release this pressure on the right pedal as you continue on to inverted. As you pass 90 degrees of bank now you need to start feeding in forward stick. You really need a lot of forward stick for this maneuver, much more than what you may think you need. As you pass the 180 degree mark you'll want to make sure to keep in a good bit of forward stick to help maintain altitude for the maneuver and also begin to add in "top" rudder (left now). When you are at the 270 degree point your rudder input should be at its maximum necessary to maintain attitude and altitude and begin to decrease it once beyond 270 degree point. Again, you will need more left rudder in this maneuver than right. If you have difficulties maintaining altitude/attitude on this maneuver it is most likely due to the inverted portion and beyond. It's a good idea to practice 2 pt. rolls and inverted flight to get a solid picture of where the nose needs to be in relation to the horizon. For the Decathlon there is a very significant difference between where the horizon is in the windscreen for upright and inverted flight.
The biggest problem I was having with this maneuver was putting in the correct amount of right rudder (I always had a lead foot on it and the roll rate would decrease) along with too little forward stick for the inverted portions. Another problem some people experience is relaxing the roll rate. It is important that you remember to keep that stick all the way to the left or right depending upon the direction of course.
The Immelman is simply a half-loop followed immediately by a slow roll to upright. It's quite challenging as you end the maneuver upright only slightly above stall speed. The pull up to the top of the loop really slows the plane down a lot. We start this one at 160mph and ends right on the 55mph mark. I've always been curious as to what the difference is between the immelman and just a half loop. The loop and roll portion of the Immelman is designed to be one fluid maneuver. There is to be no horizontal hesitation between finishing the looping portion and initiating the rolling portion. With the half loop you are supposed to have a hesitation in the inverted position before you initiate the 1/2 roll to upright.
Execution: Initiating this maneuver is the same as the loop except with about 10 extra mph on the airspeed at the beginning. You begin with an abrupt pull (around 4 G's) to raise the nose above the horizon. Just like the loop you look out the front until the horizon disappears behind the instrument panel then shift your scan to the left wingtip. Keep watching out the left window until you reach approximately 45 degrees nose high inverted. Then you begin to look out the top of the aircraft at the horizon as you simultaneously begin a 1/2 slow roll to upright. You want to start the roll at this point because the airplane is flying extremely slow and it takes a lot of energy to swing the airplane around 180 degrees without sinking out of the top. For this left hand roll you will need nearly full left rudder to keep that nose from dropping below the horizon and you'll also have to work that elevator as well to keep the nose moving in the same plane. Once all is said and done and the wings are level the aircraft will be just on the verge of stall. When I did these the first times (and actually did it correctly I might add) the airspeed indicator was showing 60 mph as soon as the wings were level again. From here it is important that you keep that nose up so you do not descend. It's similar in principle to a chandelle because your pitch attitude will be quite high as you accelerate.
The only problems I had with this were due to the timing of that roll and knowing how much rudder I needed. Here you need to start the roll well before you would think it should be started.
The Humpty-Bump is almost as fun to say as it is to fly! It is a vertical maneuver where you perform a 1/4 loop to vertical, hesitate a few brief moments, then abruptly apply aft stick and ride it around until you perform 1/2 of a loop so the nose is pointed straight down again. Since the airplane was going vertical the speed drops very quickly and the actual rotation part of the maneuver is just on the edge of stall. The top is not really a high-g maneuver... probably just about 3 or so, but it's sure fun to see that horizon come around so fast! The recovery at the end is another significant 1/4 loop pull to level. On this maneuver the judges are not looking for constant radius on the 1/4 loops. But they are looking for constant radius 1/2 loop over the top.
The other version of the humpty has you push the nose over the top instead of pull. During that part you literally get thrown straight up out of your seat and your full weight (and then some) is on the harnesses. I'm finding the difficult part of these negative-g maneuvers is keeping constant stick position and my feet on the pedals. No matter how tight the harness is, your body still moves which translates to the stick moving as well. So this can be a challenge on certain maneuvers.
This maneuver is one that I need to pay special attention to as it may cause "gray-out" and lead to disorientation. During the negative g part of the maneuver your blood pools in your head, then you abruptly pull a high positive -g recovery causing all that blood go back into the lower portion of your body. Once blood starts to leave the brain one of the first symptoms is reduction in vision thus the gray out.
Execution: This maneuver will also require a little extra speed on entry due to the hesitation in the vertical position. We fly this at about 160mph as well. You begin with a significant pull to vertical, perhaps even more aggressive than a regular loop. As you watch out the left window after the horizon is no longer visible out the front, you wait for the wing to become perpendicular to the horizon. Once it does you want to apply aggressive forward stick to stop all pitch movement and make a nice, crisp vertical hesitation. The hesitation is very slight in this aircraft and shouldn't even reach 2 seconds. After you wait that brief moment you want to haul back on the stick to pitch that nose right around to swap ends. The airplane is going to be very slow at this point and you want to make sure not to stall the aircraft. Each time I performed it I could feel significant buffeting on the controls throughout the entire 180 degree pitch. This part happens really fast and once the horizon is visible out the front you want to be sure to aggressively apply forward stick at the 90 degree point as your nose is pointed toward the ground. The other thing you need to be aware of is the fact the nose will actually want to yaw as you pitch over the top. Due to gyroscopic precession the nose will want to swing to the right, which will require a slight bit of left rudder. How much you may ask? However much is necessary. After doing it several times you'll get a feel for it (or so I'm told) Make sure to stop all aircraft movement at this time, hesitate a few brief moments, then recover as you would from the backside of a loop. Again, you don't want to hesitate too long as you will be accelerating extremely quickly. This portion should be right at 0-G's since you're headed straight toward the earth. From the cockpit, however, it will feel as negative. That's because the human body is only used to positive G's.
The outside version of this maneuver is just the same thing only reversed. You really need to pitch that nose forward a lot and feed in some serious forward stick. And since it is pitching the nose down you will want to feed in right rudder.
Want an easy way to remember which way the nose will yaw when pitching up? Think of the word "upright." That means when the nose pitches up, it will want to yaw to the right. And if you remember that, you can surely remember the opposite is true as well. Oh yeah, and that rule only applies to North American airplanes. Ones such as Yak's and Sukhoi's will be opposite since their propellers rotate counter clockwise.
So there you have it, flight number two! And now I have to wait until October 15th when my instructor gets back from a business trip to London.
Friday, September 14, 2007
Pure Magic! First aerobatic training flight
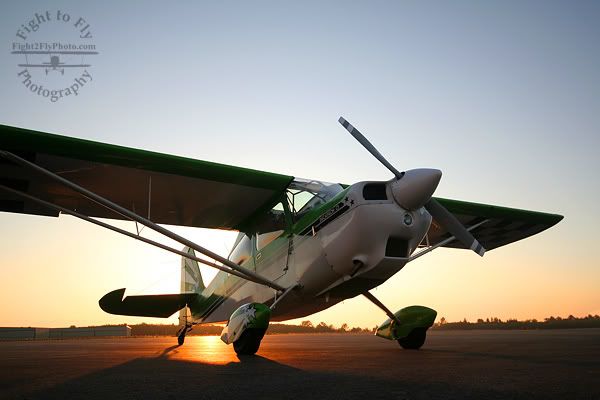
This is the airplane I'm training in, taken yesterday after my first aerobatic training flight! Beautiful airplane, isn't it?
Wow, there isn't a word in any language that can appropriately describe what that first flight was like. I've imagined that first experience countless times before in my head and none of them matching how incredible it was in real life.
From the beginning:
Matt arrived at the airport and we went up to one of the flight school offices to discuss what we would be doing for this first flight. He went over each maneuver we would do which included steep turns, slow flight, rudder turns (more on this later) falling leaf, stalls, spins, aileron rolls, and loops. He went through each maneuver describing power settings control inputs, what and where to look, and what it might feel like. I personally have read several books on the topic of aerobatics and everything he said echoed what I had already heard--which is a good thing! I'm not one who likes surprises, especially in the air!
After that was all said and done, we went out to the airplane and he briefed me on wearing the parachute and how to operate it in an emergency. He also briefed me on the harness system, door hing release mechanism and when to use them. (only when the airplane is physically unable to be controlled, IE. wing falls off) I felt he was very thorough. I've had experience wearing parachutes before when I worked at Harvey Airfield. I was able to go up in a Cessna Caravan for skydive flights and was required to wear a 'chute even though I was riding with the pilot.
Inside the plane- All strapped in and ready to go! Since I don't have my tail wheel endorsement and have very little experience in them all together he did the takeoff and landing but let me do the taxiing. The nice thing about the Decathlon is the fact you can actually see over the nose while taxiing, so it wasn't too difficult. Takeoff was quick and smooth and we were on our way up to 3,500 feet!
Upon reaching our intended altitude I started things off by doing some steep turns to the left and then to the right. Again this just gets me used to all the controls in the airplane, and gets my head "outside" the cockpit, looking for traffic and again, getting used to how things look from this airplane. My first turn was to the right and that was fine, but when I did my turn to the left, I found myself always wanting to descend. I realized about half way through that I didn't have to compensate for sitting in the left hand seat! In a Cessna the sight picture for a left steep turn is much different from that of a right hand steep turn because the seating is side-by-side. So I fixed that problem and all was well.
Then we slowed things down a bit and learned how the airplane felt in the backside of the envelope. The airplane was still very responsive and quite pleasant. One thing I began to notice at about this point is my right leg, for who-knows what reason, would tense up and would start pressing on the right rudder pedal. Every time I noticed this I'd relax it and continue what I was doing. After a while this went away. It was odd because at no time during the flight was I really anxious or nervous. Throughout the flight I made a conscious effort to keep a gentle grip on the controls. I've learned through personal experience in my flying that a tight grip on the controls leads to over-correction and sloppy flying. From what I've read that problem is multiplied when one performs aerobatics.
Rudder turns. This maneuver was simply to get me used to playing with the rudder and to show how much it authority it has on the airplane. We cruised around at about 90 mph and then I simply smoothly applied right rudder. Instantly the airplane wants to roll to the right, but part of the exorcise is to keep the wings level. So that required left stick. I was quite shocked to see just how much aileron deflection it required to keep the wings level while performing this 360 degree "flat" turn. I did this both to the left and the right.
Next up, stalls! Now I did several power on and power off stalls. For those unfamiliar with aviation terms, power on and power off simply refers to how much power is applied during the maneuver. Power off simply has the throttle at idle or near-idle power. Power on, for this flight, was just about 1,800 RPM. I got to see how the aircraft reacts to stalls and how to recover them. Again, it gradually gets me used to unusual attitudes and how the airplane reacts in different situations. Recovery is really simple, just move the stick forward and use the rudder to keep the wings level and the airplane coordinated.
Falling Leaf. This is a maneuver where the goal is actually to keep the airplane in a stall and control it with the rudder. On this flight we couldn't really get the airplane to stay in a stalled condition, but I was still able to get a good idea of how the airplane reacts to rudder inputs.
Now the fun begins: Spins! I had only been in one spin before this flight and it was a demonstration in a Cessna 150 about seven years ago. All I remembered about it was the fact it was freakin' fun! I was kind of anxious as to how I'd feel about doing these spins. Matt did one first, walking me through the process. Then he had me talk him through what I was going to do and then it was up to me. Prior to doing this myself the first time I still felt a bit weird about spinning an airplane, intentionally. For all my life I've been trying to avoid these! But, nonetheless, I slowed the airplane down, power to idle, kept bringing the stick back, slower, slower, stall horn goes off, full left rudder, full aft stick, and around I went!! Then after about 1 rotation I applied full right rudder, forward stick, spinning stopped, stall stopped, then recovered to level flight and added power to climb back up and do it again! As soon as the airplane was "flying" again I thought to myself, "That was freakin' awesome! Lets go again!" So then I did one to the right, and was quite surprised at how much faster the airplane rotates when doing a spin to the right! My instructor seemed to be impressed with the fact I was recovering from these spins on almost the same heading as when I began them. After about the second spin I had done myself I was able to sit there and count the turns in my head and know where I was in the spin. After doing several 1 and 1.5 turn spins Matt had me go beyond that to 2 and 3 turn spins. Again this was much different as at takes about 1.5-2 turns for the airplane to settle into the spin. For that early phase the rotation actually accelerates and then stabilizes in turns 2 and beyond. We did one 5 turn spin to test the theory of whether the airplane would actually recover itself from the spin, which, it did not. It may have to do with a further aft CG, and also some take longer to recover than others. But it didn't seem like the airplane was willing to help out as that stick was pressed firmly all the way back. This was the only time I felt weird during the flight but it was only dizziness from spinning around so fast. It wasn't nearly to the point of being disorienting and I was still able to control the aircraft just fine.
Rolls! After I got my fill of spins for this first flight, we moved on to aileron rolls. These were so much fun! Nothing like seeing that horizon rotate right in front of you! Doing these was pretty simple, pitch the nose down to reach 120mph, pitch up about 30 degrees, then simultaneously move the stick all the way over to one side while applying rudder in the same direction. Rudder only really needs to be applied during the first and last portions of the maneuver, but I seemed to have kept it in throughout the entire thing. Just as you begin to reach inverted it's also a good thing to add a bit of forward stick, causing you to rise up out of the seat momentarily and continue on to finish the maneuver. For a lot of these I was actually able to finish the maneuver right where I began. But there were still a few that seemed kind of odd due to inaccurate rudder use.
After having done about a dozen of those in either direction we moved on to loops. Now this was a blast too! (I know, I say that after everything) I couldn't believe how 4 g's felt when doing this! It was awesome! We pitched the nose down pretty good, then abruptly bring the stick back into our laps to pitch the nose up nice and fast. For the first little bit of the loop you look out the front, then once the horizon is no longer visible you shift your scan to watch the horizon dance around the left wingtip. This is the only real way to know where you are in the loop. Then once you are about 45 degrees inverted above the horizon you ease the pull and push the stick forward a bit to float over the top and lift out of the seat for a moment. At this point you tilt your head back and look out the top of the aircraft to watch the horizon and finish out the maneuver with another significant pull to level. For these I seemed to be a bit timid on the initial pull and the float over the top needs some work. But hey, it's my first flight! :) I need some reason to come back, right? (Ha! like I need a reason! I'm addicted!)
After doing several more of those, and some more aileron rolls I asked to do some inverted flight, just for fun. This was quite awesome. It was simply a two point aileron roll. I was surprised at how much forward stick was required to keep the airplane flying level, and to be honest, it didn't feel that bad! (I say this with ignorance because that was only -1G. I'm quite certain my opinion will change once I get anywhere beyond -1G!)
So, after that we landed, had a very brief debriefing and that was that! My first aerobatic flight under my belt! For the next flight we're going to do steep lazy-8's (wing overs basically), more spins, aileron rolls, loops, and the practice some 2 point rolls and some unusual attitude recovery exorcises.
Wednesday, September 12, 2007
Tomorrow I start my aerobatic training!
| I'm scheduled to go up with Matt at 4:30 tomorrow. We'll start with a pretty thurough preflight briefing going over the maneuvers and procedures. Once airborne we'll do some steep turns, slow flight and stalls just to get me used to how the airplane feels in different conditions. Once I begin to get used to things we will move on to spins in both directions. We'll finish up with a couple simple aerobatic maneuvers such as the aileron roll and loop. For the purposes of this flight these maneuvers will simply be to acclimate myself to the unusual attitude of aerobatic flying and the G-forces I'll be experiencing throughout the training. |
Monday, September 10, 2007
Today's meeting with my new instructor...
Today I had a nice meeting with my aerobatic instructor, Matt Groth of Northwest Aerobatics (In association with Northwest Aviation Center). He showed me the airplane and gave a nice overview of the aircraft, its systems, and the things that make it unique as an aerobatic aircraft. He flys a beautiful green and white Bellanca Decathlon CS complete with smoke system. I got to sit in the cockpit for a little while and must say I'm quite impressed with the forward visibility! Unlike most other tail-draggers, you can actually see the ground out of the front of the aircraft while taxiing.
Matt seems like a pretty cool guy and sounds like a very pleasant instructor to have. It will certainly be a good change of pace considering my past luck with instructors. (I've gone through 15, Matt is lucky number 16!)
Sunday, September 9, 2007
Finally, I get to do what I want!
I'll be turning 24 this coming Friday and all I have ever wanted to do since I could speak was to fly upside down, and every which way possible... that is, every way but straight and level. The last few years have slowly worn me down as I was beginning to think this would never be possible. I've searched high and low to try and find a place that teaches aerobatics and have had no success. At least that would not require moving.
As an act of Divine Intervention this last week I discovered that there is a fellow who flys out of Paine Field (where I work) who recently started his own aerobatic flight school, Northwest Aerobatics. Last thursday I got a copy of his syllabus, and have since communicated with the instructor about starting training ASAP.
FINALLY! We're going to meet on Monday to answer some more of my questions and figure out when to start my training. Hopefully it will begin either later this week or early next week. He has an 8 flight syllabus in his Decathlon which will walk me through all of the basic aerobatic maneuvers including aileron rolls, loops, hammerheads, spins, hesitation rolls and cuban-8's among a few others.
My dream has finally come true! All I ever wanted is a chance to prove my mettle and show that I really do have what it takes to be an airshow pilot.
I'll finally be flying airplanes in the way they're truly meant to fly... FREELY! No restraints. I'll be able to fly upside down, loop, and do whatever the airplane can take.
My long term goal is to start competing in aerobatics to build my skills and confidence that will allow me to one day fly at airshows in order to inspire others.
So, screw the boredom of flying straight and level, using autopilot and those whimpy 45 degree banked "steep" turns!!!
Saturday, September 1, 2007
Airshow Photography Tips Part I
What's my number one piece of advice when it comes to catching great photographs at airshows? Know what is going to happen ahead of time.
This can be done several different ways. One of the easiest is simply to carry a radio scanner with you that allows you to listen to the tower controllers. This may not be as good as a discrete frequency or airboss' frequency, but still gives you a good 5-10 minute heads up as to where airplanes will be approaching from, what type of airplane, and the time to expect it. Example: At the Oregon International Airshow there were three aircraft fly-by's that took place on the two show dates: the F-117, F-15, and KC-135. Because I had a scanner I was able to know where and when each aircraft would be approaching the showline a good 5-10 minutes before it was announced over the PA. This gives you plenty of time to adjust camera settings, ensure you have enough film/memory for the passes, and prepare yourself for the types of pictures you want to get.
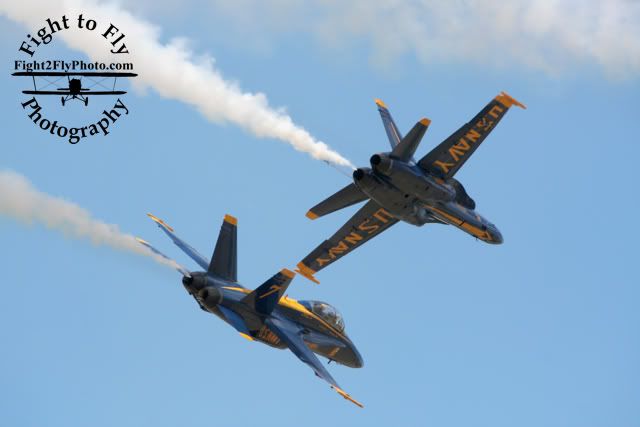
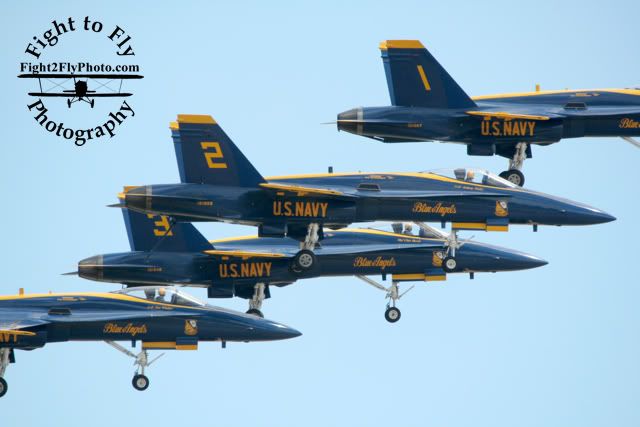
Another way you can do this is to simply familiarize yourself with airshow rutines such as the US Navy Blue Angels or USAF Thunderbirds. Both teams perform the same maneuvers in the same order each year which gives you a chance to plan ahead of time. This will make your shots much more consistant and also gives you plenty of time to setup your shot properly.
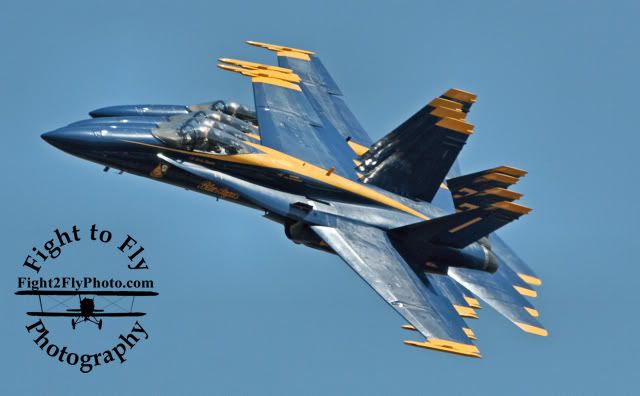 The picture above shows what is a very dynamic maneuver flown by the Blue Angels. Due to the formation and the way it is setup the apperance changes drastically to the observer on the ground.
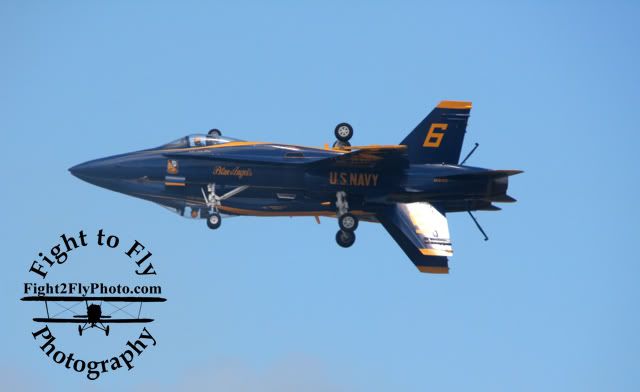
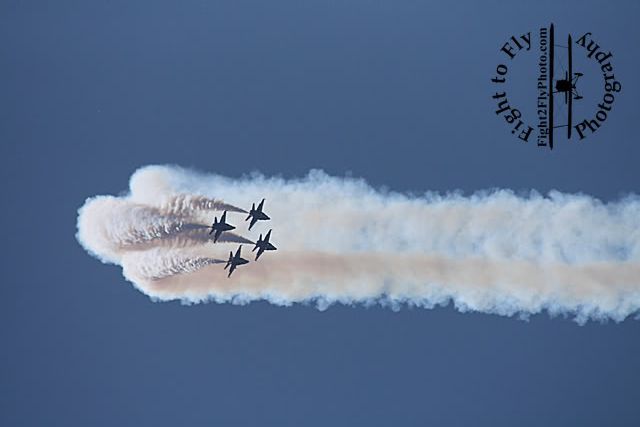
This picture of a maneuver called, "The Fortus," is also easily achievable due to prior knowlege.
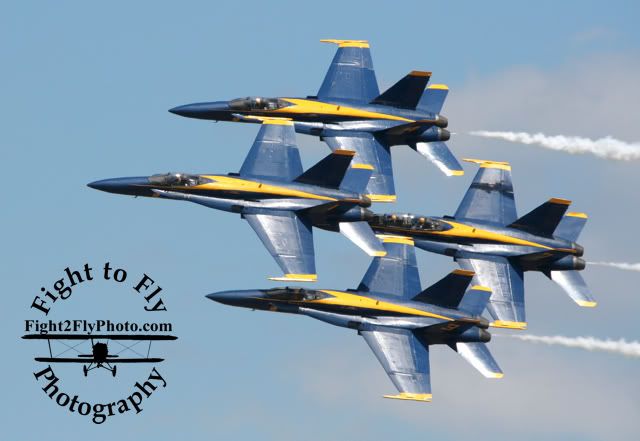
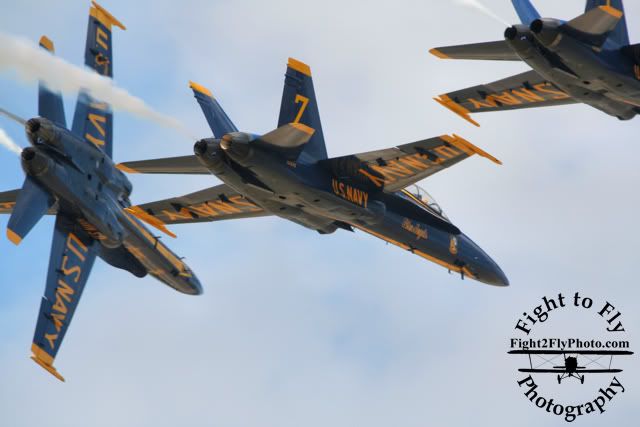 This is one of the most difficult pictures to capture at a Blue Angels show as the Diamond formation comes from directly behind the crowd. Depending upon your location at the airshow and how show center is arranged for the Blue Angles, the wingmen break formation either directly over the crowd or just in front as shown in this picture. To capture this picture I had my camera already aimed approximately where I thought the formation would fly as tracking them going directly overhead is extremely difficult. Especially with a heavy lens. Once the jets were in the viewfinder I began snapping pictures, and this was the first one off in a burst of about 5.
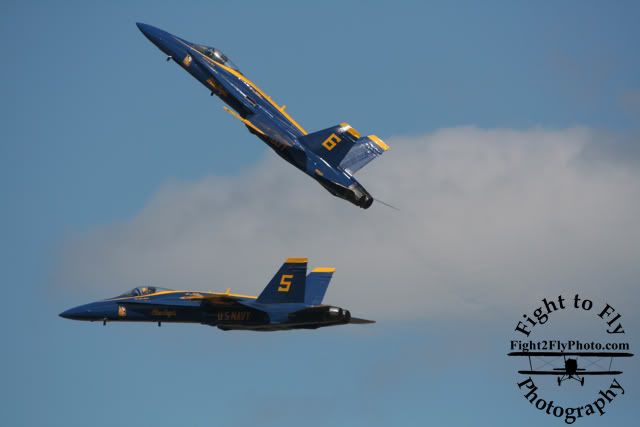
 The following was the third shot in the same burst.
That's it for now! I hope this tip is able to help you out at your next airshow outting. I'll be explaining more tips and tricks in the weeks and months to come. I will be re-writing and editing these posts in a seperate document as part of my new book. Consider these my extremely rough, rough drafts. :)
Tuesday, August 28, 2007
Blue Angels 2008 Calendar
 I just finished work on my first 2008 calendar so far! Of course, being the Blue Angels fan that I am, this first installment features the 2007 US Navy Blue Angels!
 If you're interested, please click here for a complete discription!
Wednesday, August 22, 2007
Photo Tips Part II: Shutter Speed
This post is for those of you with a camera which allows the shutter speed to be set by the user. When it comes to aviation photography many people natually think you want the fastest shutter speed possible to stop the action. This is only partially true. For jets, I generally shoot in Aperture Priority mode (Av) and when using my Sigma 50-500mm I try to keep it right at F/8. This seems to give me the sharpest pictures and is still reasonably fast even in poor weather conditions. On bright days I take advantage of exposure compensation to help ensure no light-colored areas get over-exposed. Since there are no moving parts on the jets (other than control surfaces of course) there really isn't that much of a need to blur anything on the aircraft. Even when it is close to the ground the jet is still moving fast enough to have a good bit of motion blur in the background, even at high shutter speeds.
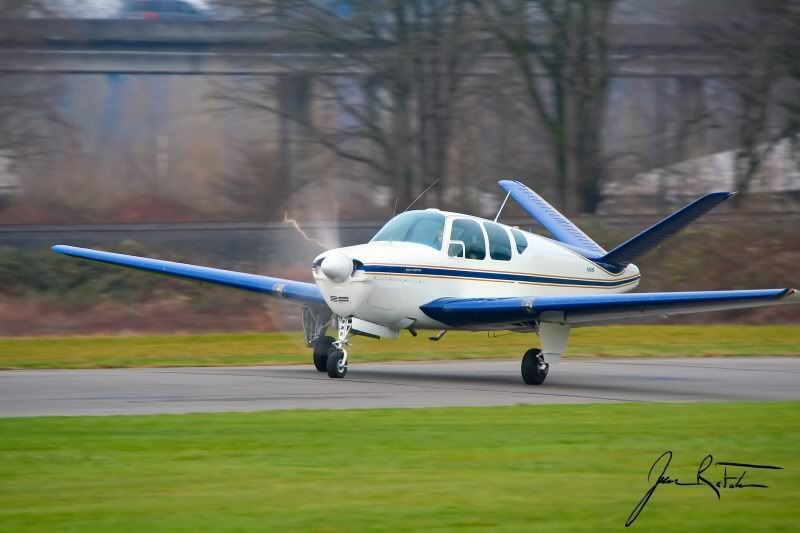
Propeller driven aircraft and helicopters are another story. These you actually want to use a slow shutter speed (no faster than 1/125 second!) so that you can see at least a partial blurring of the propeller/rotor blades. Shooting at this speed requires a great bit of panning skills and requires a lot of practice in order to become consistant. The general rule of thumb in photography regarding blurring by camera shake is to use a shutter speed equal to the length of the lens. So when I'm shooting at the 500mm end of my lens I should shoot no slower than 1/500 second to eliminate camera shake. Needless to say that isn't really an option when trying to catch a full arc of rotation on a propeller driven aircraft. One piece of equipment that may help you out is a monopod. Just like a tripod but - you guessed it - it only has one leg. This makes live as an aviation photographer much easier - especially if your lens doesn't have some sort of stabilizing feature.
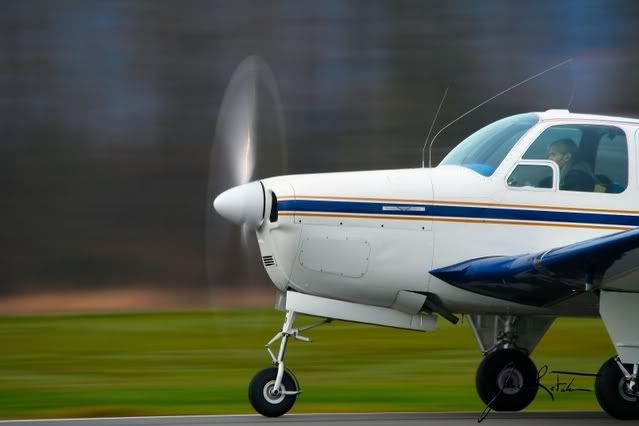
 The picture above shows the full arc of rotation as a Beech Bonanza begins its takeoff roll at full power. This was shot with my Sigma 50-500mm lens in Shutter Priority (Tv) mode at 1/60 second.
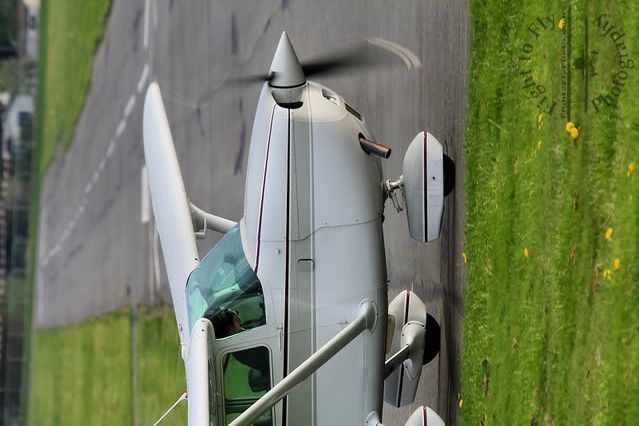 This picture shows only a partial blur of the propeller as this Cessna 172 taxis out to the runway at low power. This was shot at a shutter speed of 1/125.
Airshow pictures posted!

Well, I got all of the pictures processed and updated to my web gallery now! To view the pictures I have available for purchae, click here. I have pictures of Sean D. Tucker and Team Oracle, Renny Price, Classic Jets MiG-17, Red Bull MiG-17, Jet Provost, F-15 Eagle, and many more!
Monday, August 20, 2007
Equipment
I thought now would be a good time to do this. If any of you are curious as to what equipment I shoot with, here it is:
Canon Rebel XT - 51,000 shutter activations and still going strong!
Counting down 'till I get myself a Canon 40D :D
Sigma 50-500mm
Sigma 10-20mm
Canon 18-55mm
Canon 430EX Flash
Wolverine FlashPac 7000 60GB
Monopod
Cordless remote
That's it!
Canon Rebel XT - 51,000 shutter activations and still going strong!
Counting down 'till I get myself a Canon 40D :D
Sigma 50-500mm
Sigma 10-20mm
Canon 18-55mm
Canon 430EX Flash
Wolverine FlashPac 7000 60GB
Monopod
Cordless remote
That's it!
Wednesday, August 15, 2007
US Navy Blue Angels
 18 inches wingtip to canopy
As I hinted in a previous entry, the pictures from this last weekend turned out remarkable! I couldn't be more pleased with the pictures I got. Again I ask for patience as I sort through them and upload them to my gallery. Not only do I have 4,700+ pictures to go through, but my aunt is also visiting for the next two weeks and I'm finally able to spend some time with here and show her some cool sights in the area.
 In Thrust I Trust
But, Just for fun, I've attached a couple pics as teasers.
Tuesday, August 14, 2007
Oregon International Airshow pt. 2
One of the greatest parts of airshows is seeing other people who are passionate about flying. Working in the industry myself, I find it quite sad that there are so few people who get excited about what they do. My yearly airshow fixes help put things back into perspective for me. I was able to meet a great deal of people this past weekend at Oregon and it was such a breath of fresh air to see you so excited about aviation. My only wish is that you would go after that excitement and learn to fly yourselves. One of the remarkable things about aviation in 2007 is the fact that literally ANYONE can learn to fly. There are inexpensive airplanes to fly for those on a tight buget who simply want to get airborne, and there are airplanes you can train in that will make your head dance! It's only a matter of will power and patience.
For only $60 any of you can go to an FBO (fancy name for flight school) and take your first introductory flight lesson where you can actually fly the airplane with an instructor--just to see if you like it! I started my flying career by doing this several times starting right after I turned 13. A private pilots license runs you around $6,000 these days and you can easily obtain student loans to help offset the cost. Depending upon your flying schedule this can take anywhere from two years to six months.
So, if you've ever wanted to at least get a taste of what it's like to fly an airplane, do not hesitate! Give it a try! There is no better time than right now! :)
Monday, August 13, 2007
Oregon International Airshow, 2007
Wow, what a crazy last six days! 4,700 pictures later I've come to the conclusion that I will never be able to photograph another aviation event again. Every picture I take from this point on will be an attempt to match the pictures I captured this last week. I was VERY pleased with my results and have thousands of pictures that I will keep and through the next month(s?) I will be uploading them to my web gallery.
Right now I can only give a very brief overview of the pictures as it's late and I'm quite tired. Some of the subjects I photographed this week include the US Navy Blue Angels demonstration team, Greg Poe, Sean D. Tucker, Renny Price, the A-10 West Coast Demonstration Team, Homeland Fireworks display, Oregon Aero Skydancer, Oregon ANG F-15's, and one of the highlights of the show was the F-117A Nighthawk ("Stealth Fighter") flyby for two of the airshow days. The aircraft is being retired at the end of this year as the aircraft is already 25 years old. These two flybys marked the very last time I will ever see this jet again. :( It was kind of saddening, but after looking at the pictures I got, I was extremely pleased with the results.
Since I've obtained many pictures that made my own jaw drop (you photographers know that you're always your own worst critic) I've decided I'll start making several different 2008 year calendars. Also I will begin the process of putting together a Blue Angels photobook featuring pictures taken here in Seattle and at Hillsboro, Oregon.
Please stay tuned as I will be trying to get these pictures dealt with in a timely manner.
Thanks for checking in!
Monday, July 16, 2007
Arlington EAA Fly-In.
The Arlington Fly-In proved to be another great show for 2007. Arriving only for the Sunday show, I was greatly surprised as to the lack of attendance. There were very few aircraft as most pilots moved out earlier in the day. When it comes to photography, I couldn't ask for a better situation! No heads in the way at all!
The airshow lineup included local legends Bud and Ross Granley performing their formation routine, Julie Clark and her T-34, warbirds including the P-51 Mustang, P-47 Thunderbolt, and A-1 Skyraider. One act I saw for the first time this weekend was Red Eagle Air Sports. They are a two-ship formation aerobatic team who dazzles crowds in their Christine Eagles. The rest of the show included Kathy Hirtz, Eric Hansen, John Mrazek, Renny Price, Dr. Frank Donnelly, Ken Fowler, and Dan Buchanan.
I'm quite bummed that I am only able to watch Bud Granley fly twice this summer. Unfortunately both the Abbotsford International Airshow and Oregon International Airshow are booked on the same weekend. Due to costs and other factors I will be down in Oregon while Bud flys up in Canada.
As far as photography goes, conditions were absolutly perfect! The sky was partially sunny which provided a great background for pictures. As I mentioned in a previous blog, I really don't like having a plain blue background.
Sunday seemed to be an "off" day for me, though. Out of 1,300 pictures I only kept around 300. I intentionally used a slower shutter speed on most of the pics which meant fewer keepers. This is when I really wish I had a lens with IS!! The steady 15 kt wind didn't help matters either, as the large lens on the Sigma 50-500mm acts like a sail in the wind.
Overall I'm still satisfied with the outcome as it was good practice for the upcoming shows I will be attending when people will actually be paying for my services.
To see more great pictures from this show, please view my online gallery by clicking here.
Saturday, June 23, 2007
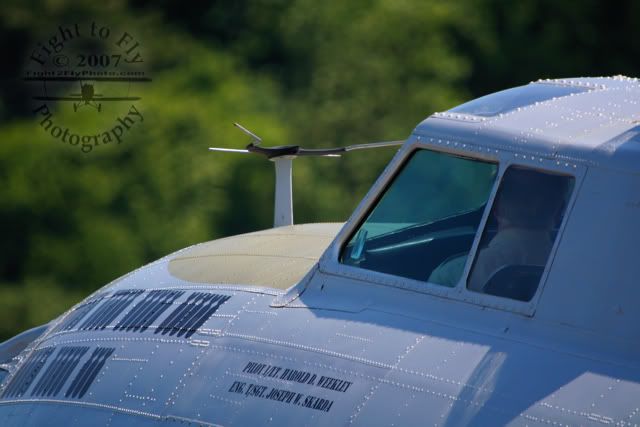
Photo Tips part I - Weather
Back in the day when I was taking pictures with a simple P&S digital camera I much prefered cloudless, blue skys whenever I was going to take pictures at an airshow. The clouds would always cause focus and exposure problems rendering most pictures useless. Now that I have an SLR camera that is more sophisticated my opinion on the "perfect airshow weather" has changed.
There are many pros and cons for both clear and cloudy conditions:
Cloudy/partially cloudy
- Much more insteresting background
- Adds dimension and scale to the image
- Shows more of the true nature of flight
- When presented with backlighting the clouds can help diffuse the light and provide softer shadows
- Evening lighting tends to really bring out the gold/red in the sunlight
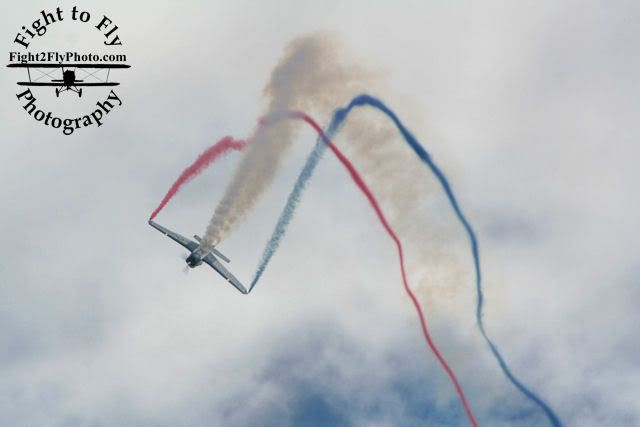
- Vapor for those hard-turning jets
This picture would be very boring if it were taken on a cloudless day.
Clear
- With the sun to your back it can really make your subject pop
- Evening lighting can create spectacular effects
- Helps to isolate your subject as well
- Fewer focus/metering issues
This picture shows how the clear sky isolates the subject and really makes it pop.
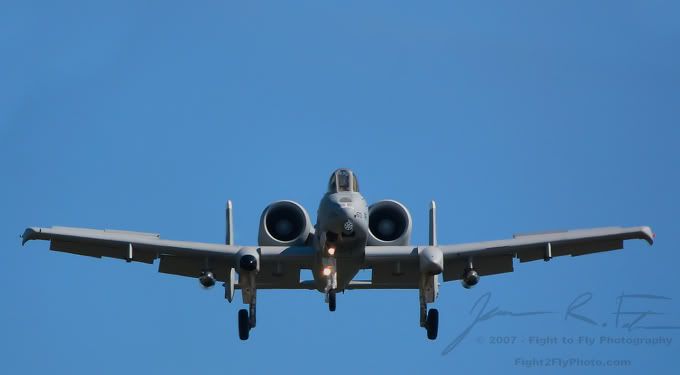
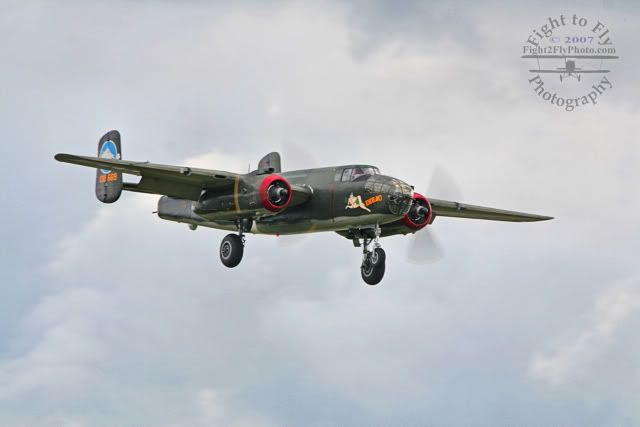
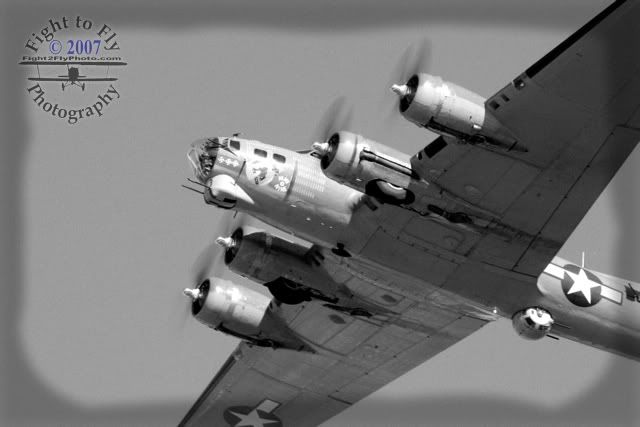
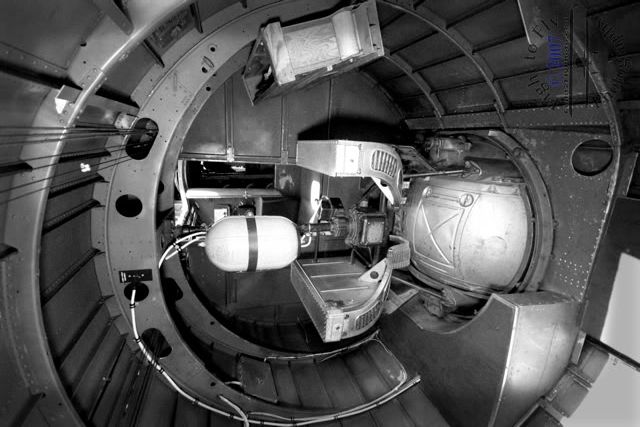
Collings Foundation Bombers....
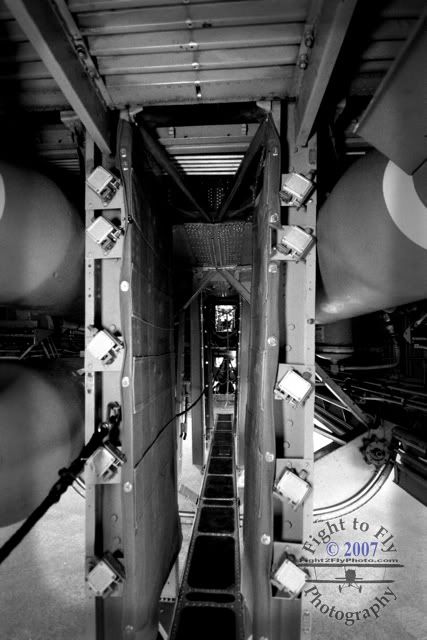
I've gone through the B-17 and B-24 in the past and was just amazed then as I am now to see just how cramped it is inside these airplanes. It's obvious they weren't designed with comfort in mind. I was initially wearing my camera bag backpack when I got inside the B-17 and quickly realized there simply wasn't enough room to maneuver through the cramped interior. To get from the front of the aircraft to the back you have to walk through a tiny walk-way that goes through the bomb-bay.
The sound these beautiful machines make is pure music. The ground shakes as their radial engines turn over and roar to life. It was such a treat being able to hear these airplanes for the last three days at work.
To view and order prints of the photos I took of these magnificant airplanes, please click here.
Friday, June 22, 2007
Paine Field Spotting...
What can I say, it's a completely different world over at Paine Field! I wouldn't say it's better but certainly different. You cannot really compare the cozzy experience of a small, home-town airport to a bustling, massive airport such as Paine. In the last few weeks I've met legends in aviation (Mr. Bud Granley), seen legendary aircraft (P-51, Hellcat, B-17, B-24, B-25,) and get to work to the wonderful music of an unimaginable combination of aircraft sounds 6 hours a day, 6 days a week!
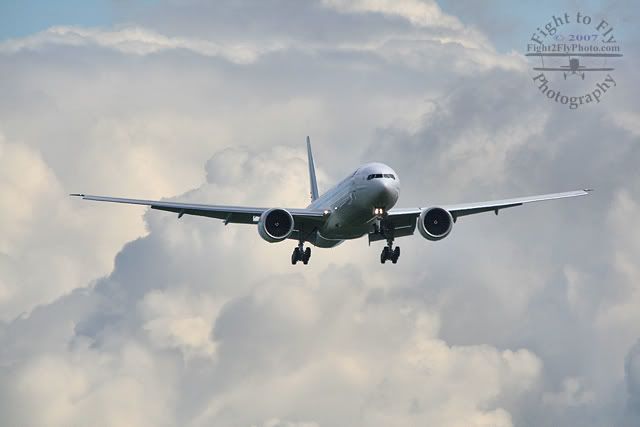
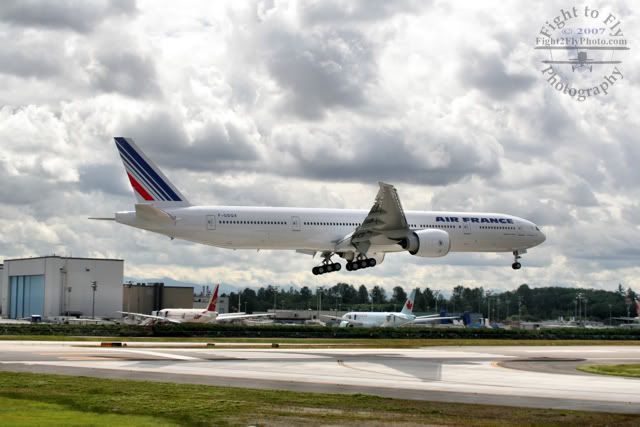
I finally have had a chance to get some pictures of some heavy metal and this morning shot an Air Canada 777-300ER, Asiana Airlines 777, Air France 777, JAL Cargo 767, Southwest 737, and two WWII bombers. Quite exciting! I also have some great pictures of Boeings 747-400 LCF that is used to transport major parts of the 787 from all over the world! Both sets are of it taking off while one shows it flying through a small cloud which creates a perfect illustration of the massive wake left behind such an aircraft!
One of the best parts of the whole experience of working here is getting to know new people. Since I hang out at the Future of Flight parking lot/viewing area after work almost every day I get to talk to all kinds of different people. I've come accross people I haven't seen in years and remembered great times from several years ago.
Enjoy!
To view and order prints of the photos I took, please click here.
Thursday, May 24, 2007
Aluminum Overcast - EAA B-17G
 During the last part of May the EAA-sponsored B-17G, "Aluminum Overcast" visited the Museum of Flight at Boeing Field in Washington. As always, I was there to tag along and try and get some shots. For years I've known Boeing Field to not be very photographer friendly so the disapointments of the days shots was to be expected. They have a very tall chain-link fence all around the place and NOTHING to stand on in order to observe the airplanes taking off or landing. One thing that I absolutly LOVE about Paine Field's Future of Flight museum is they have a series of hills right by their fence so you can EASILY see an unobstructed view of the runway. They're also placed in such a way it is impossible to jump/climb the fences. Nonetheless, I had to find some tricky places to stick my cameras lens to get some non-fence shots!
As always this bird is absolutly gorgeous and I can't even discribe the sound of those four radial engines! I've seen the B-17 many times before and it always leaves me in awe.
Of all the times I've seen the B-17 I still have yet to get a decent picture of it in the air! There is always something either in the way, or an incorrect setting that leaves them useless. But, I did manage to scrounge up a few good shots while it was on the ground.
To see my pictures from this event and/or order prints, please click here.
Saturday, April 28, 2007
Tulip Festival Fly-In!
 Skagit Regional Airport hosted the second biannial Tulip Festival Airshow and Fly-In on April 28th.
Quick Review:
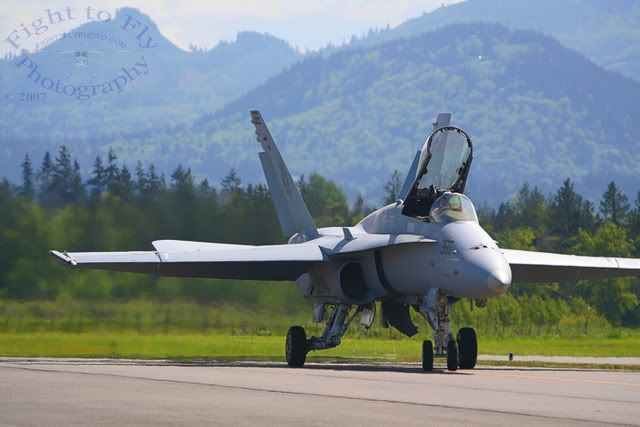
In the weeks leading up to the show I was quite surprised to find they actually had the West Coast F/A-18C Hornet team on the schedule! Unfortunately the FAA wasn't able to grant them airspace clearance to do the full tactical demonstration, but the pilots took both ships up for some section (formation of two aircraft) flyby's and touch and goes.
As for military demonstrations, they also had a SAR helicopter (MH-60) from NAS Whidbey Island perform.
The show also featured Bud and Ross Granley, a father-son aerobatic team. One flys a Yak-55 and the other flys a Yak-18 and put on an incredible show!
Warbirds are always popular at smaller airshows such as this and they did provide a pretty good showing. There were four T-6 Texans (aka: SNJ, Harvard) two T-28's, and several other aircraft. There weren't any "big" showbirds out such as a P-51, but it was still a good lineup and provided some very crowded skys!
Photography:
The showline looks directly at the sun the entire time which means you're going to have a tricky time getting properly exposed pictures. Thanks to computer technology it is pretty easy to fix these issues.
Capturing good pictures of the static display, on the other hand, was pretty easy as there really weren't a lot of people around to ruin shots.
Overview:
Great show! Especially for this early in the season it's a great time to make sure you still know how to use your camera equipment after the long winter months. :) One of the greatest parts of this show was the chance to meet several friends in person for the first time! (You know who you are!)
More Pictures:
Monday, April 23, 2007
Welcome!
Welcome to the official blog of Fight to Fly photography!
Here I will announce new galleries that are available, photo tips and tricks, and new products I'm offering for sale. Along with being an aviation photographer, I also am a private pilot so I may interject some fun flying stories as well.
Since I love both flying and photography this will contain a lot of information about both.
Happy landings and may the sun always be to your back!
Subscribe to:
Comments (Atom)