Today I had a nice meeting with my aerobatic instructor, Matt Groth of Northwest Aerobatics (In association with Northwest Aviation Center). He showed me the airplane and gave a nice overview of the aircraft, its systems, and the things that make it unique as an aerobatic aircraft. He flys a beautiful green and white Bellanca Decathlon CS complete with smoke system. I got to sit in the cockpit for a little while and must say I'm quite impressed with the forward visibility! Unlike most other tail-draggers, you can actually see the ground out of the front of the aircraft while taxiing.
Matt seems like a pretty cool guy and sounds like a very pleasant instructor to have. It will certainly be a good change of pace considering my past luck with instructors. (I've gone through 15, Matt is lucky number 16!)

Monday, September 10, 2007
Today's meeting with my new instructor...


Sunday, September 9, 2007
Finally, I get to do what I want!
I'll be turning 24 this coming Friday and all I have ever wanted to do since I could speak was to fly upside down, and every which way possible... that is, every way but straight and level. The last few years have slowly worn me down as I was beginning to think this would never be possible. I've searched high and low to try and find a place that teaches aerobatics and have had no success. At least that would not require moving.
As an act of Divine Intervention this last week I discovered that there is a fellow who flys out of Paine Field (where I work) who recently started his own aerobatic flight school, Northwest Aerobatics. Last thursday I got a copy of his syllabus, and have since communicated with the instructor about starting training ASAP.
FINALLY! We're going to meet on Monday to answer some more of my questions and figure out when to start my training. Hopefully it will begin either later this week or early next week. He has an 8 flight syllabus in his Decathlon which will walk me through all of the basic aerobatic maneuvers including aileron rolls, loops, hammerheads, spins, hesitation rolls and cuban-8's among a few others.
My dream has finally come true! All I ever wanted is a chance to prove my mettle and show that I really do have what it takes to be an airshow pilot.
I'll finally be flying airplanes in the way they're truly meant to fly... FREELY! No restraints. I'll be able to fly upside down, loop, and do whatever the airplane can take.
My long term goal is to start competing in aerobatics to build my skills and confidence that will allow me to one day fly at airshows in order to inspire others.
So, screw the boredom of flying straight and level, using autopilot and those whimpy 45 degree banked "steep" turns!!!
As an act of Divine Intervention this last week I discovered that there is a fellow who flys out of Paine Field (where I work) who recently started his own aerobatic flight school, Northwest Aerobatics. Last thursday I got a copy of his syllabus, and have since communicated with the instructor about starting training ASAP.
FINALLY! We're going to meet on Monday to answer some more of my questions and figure out when to start my training. Hopefully it will begin either later this week or early next week. He has an 8 flight syllabus in his Decathlon which will walk me through all of the basic aerobatic maneuvers including aileron rolls, loops, hammerheads, spins, hesitation rolls and cuban-8's among a few others.
My dream has finally come true! All I ever wanted is a chance to prove my mettle and show that I really do have what it takes to be an airshow pilot.
I'll finally be flying airplanes in the way they're truly meant to fly... FREELY! No restraints. I'll be able to fly upside down, loop, and do whatever the airplane can take.
My long term goal is to start competing in aerobatics to build my skills and confidence that will allow me to one day fly at airshows in order to inspire others.
So, screw the boredom of flying straight and level, using autopilot and those whimpy 45 degree banked "steep" turns!!!
Saturday, September 1, 2007
Airshow Photography Tips Part I
What's my number one piece of advice when it comes to catching great photographs at airshows? Know what is going to happen ahead of time.
This can be done several different ways. One of the easiest is simply to carry a radio scanner with you that allows you to listen to the tower controllers. This may not be as good as a discrete frequency or airboss' frequency, but still gives you a good 5-10 minute heads up as to where airplanes will be approaching from, what type of airplane, and the time to expect it. Example: At the Oregon International Airshow there were three aircraft fly-by's that took place on the two show dates: the F-117, F-15, and KC-135. Because I had a scanner I was able to know where and when each aircraft would be approaching the showline a good 5-10 minutes before it was announced over the PA. This gives you plenty of time to adjust camera settings, ensure you have enough film/memory for the passes, and prepare yourself for the types of pictures you want to get.
Another way you can do this is to simply familiarize yourself with airshow rutines such as the US Navy Blue Angels or USAF Thunderbirds. Both teams perform the same maneuvers in the same order each year which gives you a chance to plan ahead of time. This will make your shots much more consistant and also gives you plenty of time to setup your shot properly.
 The picture above shows what is a very dynamic maneuver flown by the Blue Angels. Due to the formation and the way it is setup the apperance changes drastically to the observer on the ground.
This picture of a maneuver called, "The Fortus," is also easily achievable due to prior knowlege.
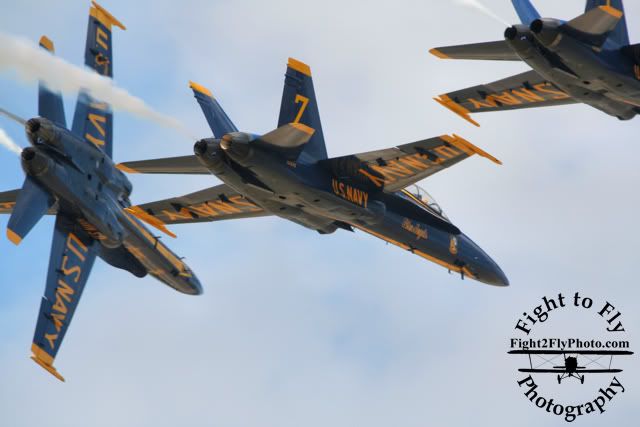 This is one of the most difficult pictures to capture at a Blue Angels show as the Diamond formation comes from directly behind the crowd. Depending upon your location at the airshow and how show center is arranged for the Blue Angles, the wingmen break formation either directly over the crowd or just in front as shown in this picture. To capture this picture I had my camera already aimed approximately where I thought the formation would fly as tracking them going directly overhead is extremely difficult. Especially with a heavy lens. Once the jets were in the viewfinder I began snapping pictures, and this was the first one off in a burst of about 5.
 The following was the third shot in the same burst.

That's it for now! I hope this tip is able to help you out at your next airshow outting. I'll be explaining more tips and tricks in the weeks and months to come. I will be re-writing and editing these posts in a seperate document as part of my new book. Consider these my extremely rough, rough drafts. :)
Tuesday, August 28, 2007
Blue Angels 2008 Calendar
 I just finished work on my first 2008 calendar so far! Of course, being the Blue Angels fan that I am, this first installment features the 2007 US Navy Blue Angels!
 If you're interested, please click here for a complete discription!
Wednesday, August 22, 2007
Photo Tips Part II: Shutter Speed
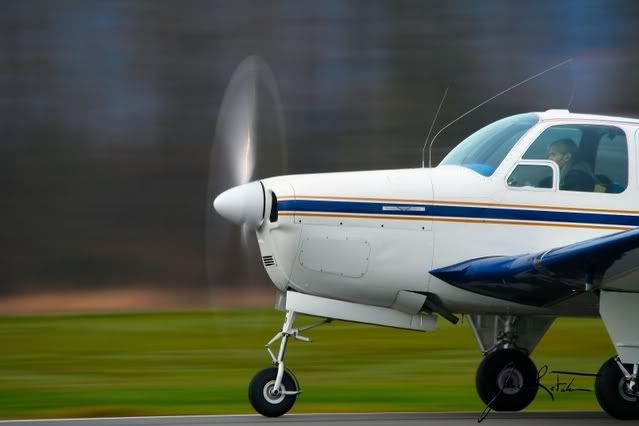
This post is for those of you with a camera which allows the shutter speed to be set by the user. When it comes to aviation photography many people natually think you want the fastest shutter speed possible to stop the action. This is only partially true. For jets, I generally shoot in Aperture Priority mode (Av) and when using my Sigma 50-500mm I try to keep it right at F/8. This seems to give me the sharpest pictures and is still reasonably fast even in poor weather conditions. On bright days I take advantage of exposure compensation to help ensure no light-colored areas get over-exposed. Since there are no moving parts on the jets (other than control surfaces of course) there really isn't that much of a need to blur anything on the aircraft. Even when it is close to the ground the jet is still moving fast enough to have a good bit of motion blur in the background, even at high shutter speeds.
Propeller driven aircraft and helicopters are another story. These you actually want to use a slow shutter speed (no faster than 1/125 second!) so that you can see at least a partial blurring of the propeller/rotor blades. Shooting at this speed requires a great bit of panning skills and requires a lot of practice in order to become consistant. The general rule of thumb in photography regarding blurring by camera shake is to use a shutter speed equal to the length of the lens. So when I'm shooting at the 500mm end of my lens I should shoot no slower than 1/500 second to eliminate camera shake. Needless to say that isn't really an option when trying to catch a full arc of rotation on a propeller driven aircraft. One piece of equipment that may help you out is a monopod. Just like a tripod but - you guessed it - it only has one leg. This makes live as an aviation photographer much easier - especially if your lens doesn't have some sort of stabilizing feature.


Subscribe to:
Posts (Atom)